Содержание
- 1 What’s This Temperature Control All About? Lets Take A Closer Look
- 2 What Does Temp Control Prevent?
- 3 And Who Is Temp Control For?
- 4 Why TC Won’t Work With Your Nichrome80 and Kanthal Coils
- 5 So what does TC mode do?
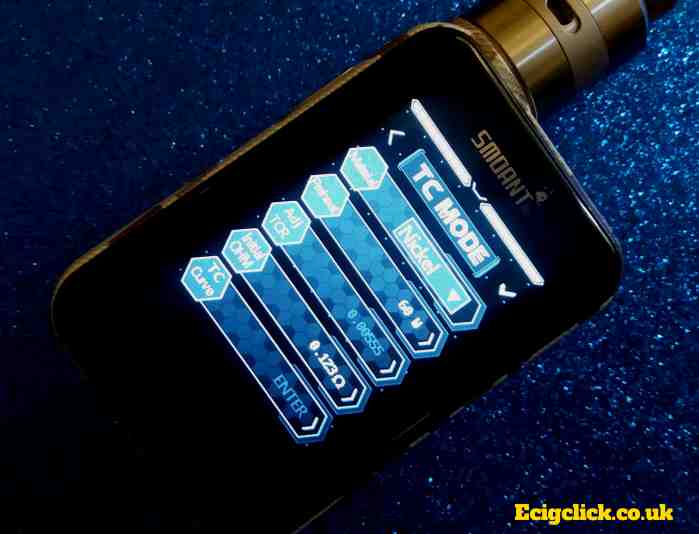
- 6 Setting Up Your TC
- 7 Stainless Steel
- 8 Nickel
- 9 Titanium
- 10 How Does TC Benefit Flavour?
- 11 Resistance Lock On Supported Devices
- 12 30 Replies to “Sigelei 213 Temp Control Mod plus TFR tutorial”

The e-cigarette and vape market sees new product hitting the shelves on a daily basis.
For quite some time now, temperature control features have been considered a standard, must have feature on box mods and any vaping device that’s compatible with an RDA.
The question is…why?
What’s This Temperature Control All About? Lets Take A Closer Look
The long and short of it is, vaping brands are trying to make your vaping experience better…they want your clouds to be BIGGER, your flavour BETTER and your vapester cred more BADASS.
This means optimizing your experience by making your coils last longer and vape to their full potential…there’s no better way to do this than with TC.
Sure, it’s a learning curve but the thing is, a half hour messing about with your TCR after installing a coil is worth it if it means that coil will live 2 weeks longer, vape 40% better and provide you with more cumulonimbus action and flavour yumminess than you could have otherwise dreamed of.
In this guide I will do my best to explain to you just what temperature control is, what benefits and drawbacks it has and hopefully it will help you determine whether it’s really for you.
What Does Temp Control Prevent?
 Have you ever had a dry hit? Ever used an RDA (Rebuildable Dripping Atomizer) and had your vape suddenly taste really nasty due to your cotton drying out? Have you ever had your cotton dry out so much that it went up in flames?
This may not have happened to you but trust me, without some acknowledgement of the TC facts, this is likely to happen to every RDA user sooner or later. I learned the hard way, when someone taking a hit of my vape in a nightclub caused it to burst into an apocalyptic vape flame display, lol! Dry hits are not just nasty, they are outright dangerous.
Not only is burned cotton the legitimate source of all those painful formaldehyde accusations that initiated vapers spend their lives fending off, it can be pretty catastrophic to your good looks also! Regular drippage is the first step in avoiding such catastrophe, TC is the second line of defence. Hell…scrap that, TC should be your first line of defence.
You might not know this but the movement of e-liqu />One feature of temperature control, on good, upmarket box mods, is that the chipset in your mod can detect when your coil is getting too hot (due to the absence of liquid) and it will cut off the power to prevent you from torching your cotton…and yourself.
In terms of benefits it’s pretty obvious, since nobody likes the taste of burnt wick and for someone who uses RDA’s a lot, it makes for a good reminder as to when you should refill your atomizer due to a low juice level.
TC sets acts as an autopilot while you vape, using its programming of a coil types boundary temperatures to adjust your wattage as you vape. So your coils won’t overheat and try to kill you!
And Who Is Temp Control For?
Fine, so those of us who’ve been dripping for a while may have learned to keep that cotton soaked but accidents still happen, what with distractions such as people of the opposite sex, alcohol and bad drivers, plus…for beginners to the RDA game, this feature is obviously invaluable.
On top of that, certain wire types, as you’ll learn later in this article, are simply TOO DANGEROUS to use out of TC mode. TC is a standard feature for VARIOUS reasons.
What’s more, if you think your use of regular sub-ohm tanks makes this article irrelevant to you, think again. Cotton burn prevention (a feature of TC) also works in Sub Ohm tanks that use pre-made, replaceable TC compatible coils.
I am sure we’ve all been at that stage with a tank or clearomizer when the coil starts to get really grungy…we taste the burn but life just doesn’t spare us a moment (or the energy) to actually go to the trouble of changing coils.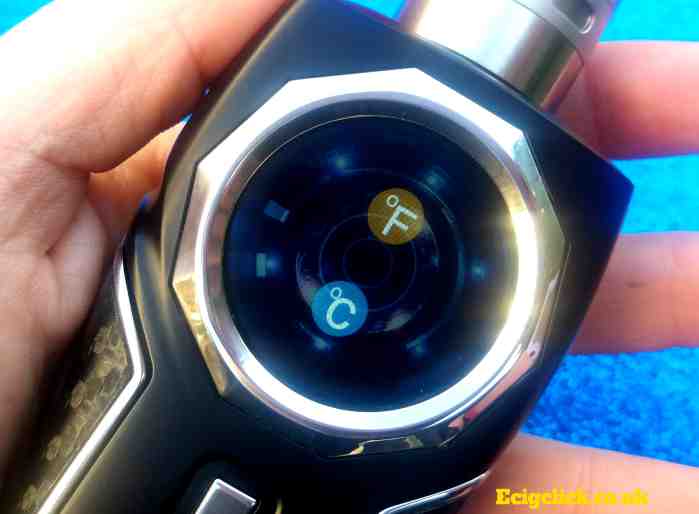
When using a coil with your mod’s TC and a little know how, this situation is unlikely to ever occur…and if it does it will have been a long time coming.
Please note. Don’t use anything other than a Nickel, Titanium or Stainless Steel coils when using the temperature control mode on your device. Other coil types will not function correctly…here’s why:
Why TC Won’t Work With Your Nichrome80 and Kanthal Coils
In order to regulate wattage in accordance with each coil’s limits, your mod’s chipset will read minute changes in the resistance for each TC compatible wire type and use this information to predict future changes.
Wiretypes SS, Ti and Ni each have what is known as a workable Temperature Coefficient of Resistance or TCR! This is measured in units of resistance increase per temperature unit, whether Farenheit or Celcius.
Each one of these wiretypes will increase resistance with heat and decrease again once cooled.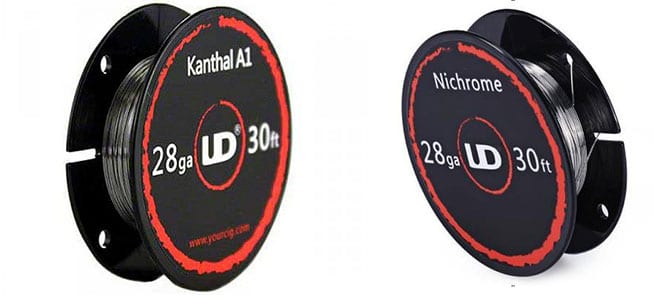
Your mod uses this predictability to its advantage by reading those resistance changes and then using the values to determine future changes and set the TC accordingly.
The higher the coil’s TCR (the more it changes as it heats), the more accurate the mod’s TC adjustments will be.
Of the three common TC wire types, Nickel (Ni200) has the highest TC, followed by Titanium (Ti), which has roughly half the coefficient of Nickel, then there’s Stainless Steel (SS) behind that, at about a sixth of Nickel and a third of Titanium. It follows that accuracy will drop proportionally with each of these wire types.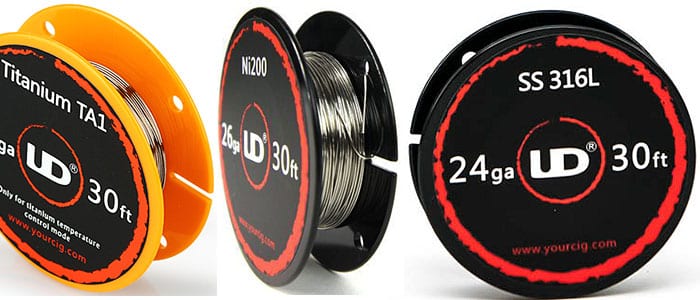
Kanthal and Nichrome are not on that list because their coefficient is so extremely low.
Because Kanthal (Ka1) and Nichrome (Ni80) barely change at all when heated, they are useless in TC mode
You see, your mod USES resistance readings in coils to determine temp changes, because it has no internal thermostat.
Okay…got it? Only Titanium, Stainless Steel and Nickel are suitable for TC vaping. Some mods will include variations of SS and the other metals. If these metals, only SS can be used outside of TC.
So what does TC mode do?
Basically, TC mode will allow you to vape safely on a given coil type, within boundaries, pre-programmed boundaries. The boundaries are set in degrees celsius or Fahrenheit. Vaping outside these bounds will be limited by power drops or cut outs and basically, you and your coil will be kept safe from dry hits and a world of pain.
 One of the best things about TC is that it will account for your vape-idiosyncrasies, such as extended hits or chainvaping to ensure that you stay within the limits of what is safe for you and your chosen coil type. It does this by constantly adjusting power output while you vape, using your temp control parameters.
TC acts as an invaluable safety feature and should be USED AND NOT IGNORED.
Setting Up Your TC
Okay…now, depending on the type of mod you’re using, you may or may not be able to adjust wattage directly while in TC mode. So, just in case you have this type of mod, I’ll explain set up with you in mind.
If your mod allows in TC wattage adjust, good for you! That means you’ll have the added bonus of playing around with your wattage once you’ve set your TC.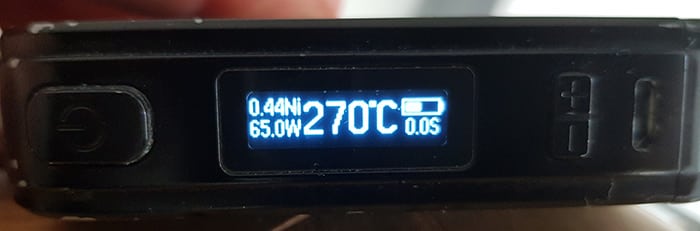
The point is that TC adjusts power output anyway so it’s probably best to think in terms of Celcius or Fahrenheit when vaping TC, rather than wattage.
Hopefully, you’ll be able to use this information to work your way around the unique chipset and programming of your vape mod.
First up…Find the perfect wattage for your coil. If using a premade coilhead on an enclosed atty, read the recommended wattages printed on the coil head and cycle through them slowly until you find the wattage that’s best for you…it needn’t be perfect because the temp control is where you’ll get to fine tune your vape within that wattage range.
If using an RDA…check out the ‘observing your coils’ section in our Power/Temp Curve article and follow this method to find your perfect wattage.
Second up…Once wattage is set, use your knowledge of your coil type or material to enter into the TC mode that’s relevant, ie: Ti, Ni or SS.
Most mods will now place you at a pre-programmed wattage and a low-temperature setting. If, for some reason, your mod doesn’t start you at a low setting, we suggest you scroll down, just in case. It’s better to be safe than sorry, any damn day.

Third up…Now it’s time to start exploring, by starting low, increasing in increments of 5 or ten degrees and then finer tuning when you encounter a stretch that tastes and vapes good.
You may find that certain juices favour a hotter vape. You may find that lowering the temp brings out the best in others. The point is that you’ve added more variables to the mix, your vaping experience has now been injected with potential.
Stainless Steel
Every wire type has its benefits and drawbacks. When it comes to SS, the benefits are manifold.
Firstly, SS operates just fine in power mode because of its extreme durability under heat. SS wires require massive temps before the metal begins to ox />
So…this means that SS, of the three wire types, is the safest and best when you’re new to TC, because you can take it in to VW or VV mode without the risk of inhaling anything noxious by accident.
The second benefit is even more interesting.
Because SS, which is usually seen in its SS316-L variety in coiling wire, has the highest resistivity of the three common TC wiretypes, it allows for more complex, alien, competition and flavour coils to be built without bringing the resistance so far down that you aren’t going to be able to power them up without overheating your device or making it cut out altogether.
So…if building fancy coils is your game, SS coils may well before you. The trouble comes in with its TCR. It’s not as sensitive to heat as other variations and so, unless you have one of the more sensitive mods on the market, your TC might not be very accurate. Nevertheless, the fact that the wire is so safe makes up for this.
I have found that, given the relative safety and the high resistance of SS wire, it is by far the MOST fun to play with when building funky coils…and in spite of relative inaccuracy, I also find it the most useful AND SAFE when getting used to the idea of vaping at different temperatures. SS is recommended for newcomers to TC.
Nickel
Nickel-ni200, is by far the most popular wire type to play with in TCM. Not only is it cheap AF, it is also pretty darn accurate in TC. It’s a damn site more accurate, due to its much higher TCR, than SS, put it that way.
When it comes to building fancy flavour wires that you could post on Instagram…you might find that Ni lets you down…the resistance is just too low. That’s why fancy coils that do have nickel in them tend to be mixed with SS to up the resistance a bit.
Nickel’s low resistance, extreme pliability and high TCR combine to make a wire that, at least when you start vaping on it, requires “breaking in.” It has a tendency to change resistance massively within the first burns so there’s no point locking your resistance until you’ve adequately broken the coils in.
Now, since Nickel makes some seriously TOXIC oxides in the upper temp levels, it is not advised that you play around with it in a reckless fashion. NiO2 for example…is so damn unfriendly that I suggest you burn this into your consciousness:Nickel should only be vaped in TC mode.
The oxides formed by Nickel at high temperatures are anything but safe and what’s more, when you pulse Ni coils, which you should never do…a layer of these oxides is formed on the coil surface, which you will then inhale with your first hit so PLEASE, don’t pulse em!
Nickel, however, is absolutely spectacular for using in TC…but you gotta do it right and remember, DON’T PULSE AND DO START LOW!
It does take some getting used to and one of the most important things is that you need to space your coil wraps evenly. Since you can’t dry burn Nickel like you would Kanthal in order to pinch your coils it is trickier.
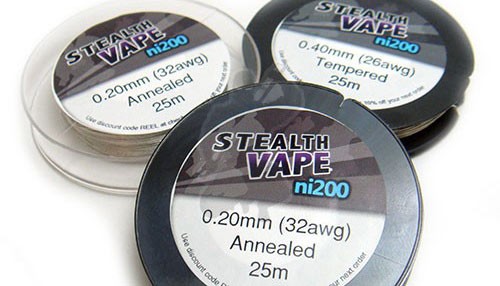
If you are interested in working with Nickel wire then do go to Stealthvape and purchase their Tempered Ni200 Wire because it is stronger and easier to work with.
When fitting Nickel wire you do need to make absolutely sure that the wire is firmly secured. If the wire isn’t secured properly the device will show inaccurate results and you do require accuracy for temperature control to function correctly.
The problem is that being very soft Nickel tends to break quite easily when screwing down Philips screws so it is advisable that you only build Nickel coils on RTA’s and RDA’s that have grub screws because they don’t tend to snap the wire.
Spacing your coils can either be done on a coiling tool by hand or for better results it is advisable to use a typical bolt that has evenly spaced threading. Make sure the bolt is the correct diameter according to the coil you wish to make and then wrap you nickel in the tracks of the bolt’s threading. Believe me, it makes things much easier.
Wicking an Ni200 coil is a little different.
The key thing I will say here is that “less is more”. You ideally want to use far less cotton than you would typically would for a Kanthal build.
It will take a little experimenting for you to get the right results but one thing to note is that if your device is having hissy fits stating “Temperature Protect” with a new Ni200 coil that has been wicked and juiced then too much cotton is the typical culprit.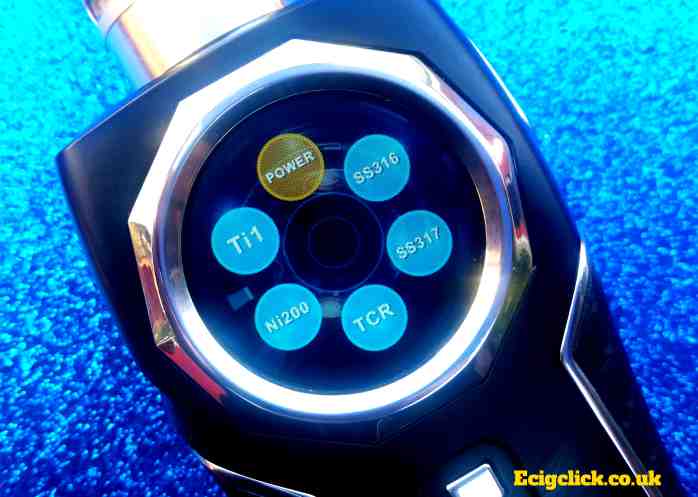
Titanium
With about half the TCR of Ni and a way higher TCR than SS, Ti is the middle ground. Ti also rocks a low enough resistivity to afford you a little creative flare when building, provided you’re strong as hell, coz it’s a hard wire to bend. Unfortunately, price makes it inaccessible to most of us.
One of the greatest features of Ti wire is, as you can imagine, the durability of your build once you’ve built it. Not only will your fancy coiling hold its shape, it will make the build into a tricky deck with ease.
We’ve all heard that incredibly irritating song and I think most of us have felt the allure of shiny titanium coiling wire but the fact is, you’re not really missing anything here, well…that’s what I like to tell myself.
Not only is the stuff super pricey but there are drawbacks to Titanium coils since there is the potential to give off Titanium Dioxide at extreme temperatures.
Titanium is not as widely used as Nickel for the time being and rather than writing a massive amount about it here you would be better served by reading the following articles:
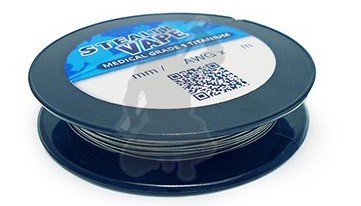
If you do intend to work with Titanium then please do make sure to buy only Medical Grade Titanium which can be found at Stealthvape .
Also, pulse it only at the lowest wattages, under 20W and never allow it to glow when pulsing or you will risk a toxic oxide build up. AND NEVER USE OUT OF TCM, for goodness sake.
How Does TC Benefit Flavour?
Have you ever found that you hit the sweet spot with your vape, where it just tastes and vapes way better? Some coils work better at a specific wattage and sometimes the juice just tastes that little bit better at a certain temperature, noticeably when the coil has been heated several times in a row.
One of the most useful features of temperature control is that it allows for flavour adjustment, refinement and enrichment. Think of the way coffee smells when it’s being roasted and get the idea. Some flavours sing when they are warmed, some…like natural fruits, become sweet and even sickly.
Temp control not only allows you to set the wattage that best suit’s your coil, juice consistency and flavour, it lets you go a step further.
Temp control lets you adjust the temperature at which your juice is being vaped…a higher temp might bring out nuances of flavour you never thought possible with a particular juice. On the other end, a lower temp could stop you burning your juice and ruining the subtler notes in the flavour. Indeed, you’ll find that keeping temp down on a minty juice enhances the cooling effect.
I actually discovered the joys of temp control by using it for flavour enrichment alone.
By also allowing the adjustment of temperature you can get a lot more refinement and flexibility to your vape than you would with Kanthal coils and regular wattage adjustment.
At the end of the day the simplest way to put it is like this:
Sometimes juices just don’t taste right and adjusting the wattage up or down is not doing the job… but by tweaking the actual temperature you can get far better results.
Don’t knock it until you’ve tried it! What I’m saying is, temperature control could help you to make the most of those juices you buy but haven’t really developed a taste for!
Resistance Lock On Supported Devices
A very useful feature of many new vape mods that feature temperature control is the ability to lock the resistance. How this works is typically by screwing on a new atomizer and then using whatever control your particular mod uses to lock it in.This ensures that the temperature control will always work accurately….it’s known as BASE RESISTANCE, which is the resistance of that particular coil at room temperature.
Put room temperature atomizers on your mod before enabling temperature control
This one is pretty much common sense but some people still fall foul of it. If you want your device to give you an accurate result when you screw on your atomizer please make sure it is completely cool.
An atomizer that has been used on another temperature control device which has been heated up will mean you get the wrong base temperature for it on a new device and this can cause you lots of issues.
Final Words
This temp control gu >vapers looking to get more information on TC but not just that, I want it to inspire you to use your TC.
Not only will your TC help keep you and your gear safe and functional, it will help you to bond with your mod and get the most out of your coils and your juices. Give it a try, it really is worth it.
Всем привет) Чет какая-то дичь происходит) Поставил новый марлин. стол стал греться рывками т.е не греться( Светодиод мигает( Откатился на старый( Со второго слоя надпись Sleep.
#define TEMP_SENSOR_0 1
#define TEMP_SENSOR_1 0
#define TEMP_SENSOR_2 0
#define TEMP_SENSOR_3 0
#define TEMP_SENSOR_4 0
#define TEMP_SENSOR_BED 1
// Dummy thermistor constant temperature readings, for use with 998 and 999
#define DUMMY_THERMISTOR_998_VALUE 25
#define DUMMY_THERMISTOR_999_VALUE 100
// Use temp sensor 1 as a redundant sensor with sensor 0. If the readings
// from the two sensors differ too much the print will be aborted.
#define MAX_REDUNDANT_TEMP_SENSOR_DIFF 10
// Extruder temperature must be close to target for this long before M109 returns success
#define TEMP_RESIDENCY_TIME 10 // (seconds)
#define TEMP_HYSTERESIS 3 // (degC) range of +/- temperatures considered ‘close’ to the target one
#define TEMP_WINDOW 1 // (degC) Window around target to start the residency timer x degC early.
// Bed temperature must be close to target for this long before M190 returns success
#define TEMP_BED_RESIDENCY_TIME 10 // (seconds)
#define TEMP_BED_HYSTERESIS 3 // (degC) range of +/- temperatures considered ‘close’ to the target one
#define TEMP_BED_WINDOW 1 // (degC) Window around target to start the residency timer x degC early.
// The minimal temperature defines the temperature below which the heater will not be enabled It is used
// to check that the wiring to the thermistor is not broken.
// Otherwise this would lead to the heater being powered on all the time.
#define HEATER_0_MINTEMP 5
#define HEATER_1_MINTEMP 5
#define HEATER_2_MINTEMP 5
#define HEATER_3_MINTEMP 5
#define HEATER_4_MINTEMP 5
#define BED_MINTEMP 5
// When temperature exceeds max temp, your heater will be switched off.
// This feature exists to protect your hotend from overheating accidentally, but *NOT* from thermistor short/failure!
// You should use MINTEMP for thermistor short/failure protection.
#define HEATER_0_MAXTEMP 275
#define HEATER_1_MAXTEMP 275
#define HEATER_2_MAXTEMP 275
#define HEATER_3_MAXTEMP 275
#define HEATER_4_MAXTEMP 275
#define BED_MAXTEMP 150
// PID Tuning Guide here: http://reprap.org/wiki/PID_Tuning
// Comment the following line to disable PID and enable bang-bang.
#define BANG_MAX 255 // limits current to nozzle while in bang-bang mode; 255=full current
#define P >
#if ENABLED(PIDTEMP)
//#define PID_AUTOTUNE_MENU // Add PID Autotune to the LCD ‘Temperature’ menu to run M303 and apply the result.
//#define PID_DEBUG // Sends debug data to the serial port.
//#define PID_OPENLOOP 1 // Puts PID in open loop. M104/M140 sets the output power from 0 to PID_MAX
//#define SLOW_PWM_HEATERS // PWM with very low frequency (roughly 0.125Hz=8s) and minimum state time of approximately 1s useful for heaters driven by a relay
//#define PID_PARAMS_PER_HOTEND // Uses separate PID parameters for each extruder (useful for mismatched extruders)
// Set/get with gcode: M301 E[extruder number, 0-2]
#define PID_FUNCTIONAL_RANGE 10 // If the temperature difference between the target temperature and the actual temperature
// is more than PID_FUNCTIONAL_RANGE then the PID will be shut off and the heater will be set to min/max.
#define K1 0.95 //smoothing factor within the PID
// If you are using a pre-configured hotend then you can use one of the value sets by uncommenting it
#define DEFAULT_Kp 22.2
#define DEFAULT_Ki 1.08
#define DEFAULT_Kd 114
//#define DEFAULT_Kp 7.0
//#define DEFAULT_Ki 0.1
//#define DEFAULT_Kd 12
// Mendel Parts V9 on 12V
//#define DEFAULT_Kp 63.0
//#define DEFAULT_Ki 2.25
//#define DEFAULT_Kd 440
// Select PID or bang-bang with PIDTEMPBED. If bang-bang, BED_LIMIT_SWITCHING will enable hysteresis
// Uncomment this to enable PID on the bed. It uses the same frequency PWM as the extruder.
// If your PID_dT is the default, and correct for your hardware/configuration, that means 7.689Hz,
// which is fine for driving a square wave into a resistive load and does not significantly impact you FET heating.
// This also works fine on a Fotek SSR-10DA Solid State Relay into a 250W heater.
// If your configuration is significantly different than this and you don’t understand the issues involved, you probably
// shouldn’t use bed PID until someone else verifies your hardware works.
// If this is enabled, find your own PID constants below.
// This sets the max power delivered to the bed, and replaces the HEATER_BED_DUTY_CYCLE_DIVIDER option.
// all forms of bed control obey this (PID, bang-bang, bang-bang with hysteresis)
// setting this to anything other than 255 enables a form of PWM to the bed just like HEATER_BED_DUTY_CYCLE_DIVIDER did,
// so you shouldn’t use it unless you are OK with PWM on your bed. (see the comment on enabling PIDTEMPBED)
#define MAX_BED_POWER 255 // limits duty cycle to bed; 255=full current
//#define PID_BED_DEBUG // Sends debug data to the serial port.
//120V 250W silicone heater into 4mm borosilicate (MendelMax 1.5+)
//from FOPDT model – kp=.39 Tp=405 Tdead=66, Tc set to 79.2, aggressive factor of .15 (vs .1, 1, 10)
#define DEFAULT_bedKp 10.00
#define DEFAULT_bedKi .023
#define DEFAULT_bedKd 305.4
//120V 250W silicone heater into 4mm borosilicate (MendelMax 1.5+)
//#define DEFAULT_bedKp 97.1
//#define DEFAULT_bedKi 1.41
//#define DEFAULT_bedKd 1675.16
// FIND YOUR OWN: ‘M303 E-1 C8 S90’ to run autotune on the bed at 90 degreesC for 8 cycles.
// This option prevents extrusion if the temperature is below EXTRUDE_MINTEMP.
// It also enables the M302 command to set the minimum extrusion temperature
// or to allow moving the extruder regardless of the hotend temperature.
// *** IT IS HIGHLY RECOMMENDED TO LEAVE THIS OPTION ENABLED! ***
#define EXTRUDE_MINTEMP 170
// This option prevents a single extrusion longer than EXTRUDE_MAXLENGTH.
// Note that for Bowden Extruders a too-small value here may prevent loading.
#define EXTRUDE_MAXLENGTH 200
* Thermal Protection protects your printer from damage and fire if a
* thermistor falls out or temperature sensors fail in any way.
* The issue: If a thermistor falls out or a temperature sensor fails,
* Marlin can no longer sense the actual temperature. Since a disconnected
* thermistor reads as a low temperature, the firmware will keep the heater on.
* If you get ‘Thermal Runaway’ or ‘Heating failed’ errors the
* details can be tuned in Configuration_adv.h
#define THERMAL_PROTECTION_HOTENDS // Enable thermal protection for all extruders
#define THERMAL_PROTECTION_BED // Enable thermal protection for the heated bed
Wire wizard for TFR: Ссылка Sigelei’s TCR tool: Ссылка …
30 Replies to “Sigelei 213 Temp Control Mod plus TFR tutorial”
My favorite mod by far. For anyone curious, all the Sigelei TCR calculator does is multiply a TCR in per deg C by 5/9 to get it in per deg F. No big deal.
Bought this today pretty happy with it. Con for me was the minimum of 0.1 ohm which makes nickel or nichrome clapton difficult for me at least even the evic vt which is ancient now could go to 0.06 which meant I could just enable dual claptons. Also got the stainless steel coils for the aspire cleito tank which is by far the best tank I’ve ever had and a rebuild able section which came with dual claptons installed unfortunately they had run out of stock of the larger glass 5 ml which is much better for the rba. Didn’t enjoy the stainless coil in TC mode though it worked fine also works in power mode but kanthal 0.4 coil tasted a lot better imo. The preheat feature is amazing didn’t notice you mention it but it’s great in power mode and I like how they managed to implement it in TC mode also. Cheers
I hear you buddy, I have to say all I use this mod for is Wattage mode so it’s no issue for me.
I think I must have forgot to talk about the pre-heat mode in power which obviously can help a lot with coils that need help ramping up.
Thanks for you comments.
I can’t get my 213w out of wattage mode. Every time I try, it says «Resistance Settings Only For Temp Mode.»
I’ve tried several different tanks, I’ve tried using clapton coils, Kanger OCC, Kanger SSOCC coils…it will not change.
I don’t know what to do. I’ve tried contacting Sigelei, but that’s futile.
Any help would be appreciated.
+AversaS I’m sorry to hear that you are having issues with the mod. I would contact your vendor and ask for a replacement.
I know this is 2 years old but you were pressing the buttons wrong. You were reading resistance, not changing modes. Triple click the fire button to enter mode menu. Hold both up and down buttons together to read resistance, up button and fire button held together and waiting will bring you to the preheat menu. Maybe this will help someone sometime. I’m having my own issues.
Hey mine keeps saying «short» can you help me out
+The96jaime I’d need a bit more detail dude. Is it doing it on all atties that you put on the mod?
fuchai 213 need these adjustments and calculators ? or it works ok with celcius ?
+Hugo Faria I’m not sure I don’t have a the fuchai 213
I have to change the value of the TCR based on each temperature I put in sigelei ? for example this table SS316L : Ссылка
If I use 300Cº or 572Fº the TCR must be set to 1246 ?
+Hugo Faria ahh OK my understanding is you use standard tcr not sigelie’s