Содержание
- 1 The interface
- 2 Technical details
- 3 Workshop
- 4 Basic Examples
- 5 Videos
- 6 Exercices
- 7 For Developers
- 8 Hi Scratch for Arduino!
- 9 HTTP API
- 10 Test web application
- 11 Version 1.6
- 12 Version 1.5
- 13 Version 1.4
- 14 Version 1.3
- 15 Installing S4A into your computer
- 16 Installing the Firmware into your Arduino
- 17 Arduino drivers
- 18 For Developers
- 19 Alternative download site
- 20 Coming Soon!
- 21 General questions
- 22 Installation troubleshooting
- 23 Board connection troubleshooting
- 24 Marina Conde
- 25 VГctor Casado
- 26 Joan GГјell
- 27 Jose GarcГa
- 28 Bernat Romagosa
- 29 Jordi Delgado

Итак, начнем с вопроса зачем это нужно. Последнее время, знакомство детей или просто начинающих начинается со среды программирования Scratch. Эта среда очень хороша для начала, наглядна, проста. Освоив Скретч вы можете программировать собственные игры, анимации, а вступив в Интернет-сообщество – делиться своими творениями с другими. Скретч помогает научиться творчески мыслить, но оставаясь внутри компьютера это всего лишь программа.
Первые попытки соединить Скретч с чем-то осязаемым – это, если я не ошибаюсь, было соединение с наборами Lego WeDo – стартовый набор, позволяющий создавать некоторые модели и управлять ими с компьютера, подключать к компьютеру внешние датчики и т.д. Подробнее на https://scratch.mit.edu/wedo
С появлением платформы Arduino, возникла идея совместить её со средой Скретч. И эта идея была реализована командой разработчиков S4A (см. http://http://s4a.cat/ – это их официальный сайт).
S4A – это модификация Scratch, которая позволяет просто программировать аппаратную платформу Arduino. Позволяет использовать новые блоки для управления датчиками и исполнительными механизмами, подключенными к Arduino . Существует также панель отчетов с сенсорами, подобная PicoBoard.
Основная цель проекта – привлечь людей в мир программирования. Целью также является обеспечение интерфейса высокого уровня для программистов Arduino с такими функциональными возможностями, как взаимодействие с набором плат через пользовательские события.
В S4A доска Arduino представлена специальным видом спрайтов, автоматически найдет порт USB, на котором подключена плата.
Одновременно можно подключиться к нескольким доскам, просто добавив новый спрайт Arduino.
S4A обратно совместим с Scratch, поэтому в нём можно открывать проекты Scratch. Однако вы нельзя делиться своими проектами на веб-сайте Scratch, потому что это противоречит условиям использования Scratch.
Обмен данными следует протоколу PicoBoard и требует наличия конкретной программы (скетча), которая будет установлена на плате Arduino. Также поддерживается поддержка PicoBoard вместе с платой Arduino.
Итак, вот что нам потребуется:
- S4A – модифицированный Scratch, последнюю версию которого можно скачать с официального сайта: http://http://s4a.cat/
- Плата Arduino. Мною проверена работа с платами:
- Самодельная плата Arduino – с установленным контроллером ATMega168 (с ATMega8 работать отказалась, причину пока не выяснил)
- Pro Mini ATMEGA328P
- Скетч для Arduino s4afw16.zip – версия 1.6
- Программа Arduino IDE
Далее последовательность действий такая:
- Подключаем плату Arduino к компьютеру.
- Устанавливаем и запускаем Arduino IDE.
- Загружаем в Arduino IDE скетч с прошивкой.
- Устанавливаем и запускаем S4A
Все. После запуска S4A она сама найдет подключенную к компьютеру плату Arduino. Следует знать, что сама Scratch-программа не загружает в Arduino, оставаясь на компьютере и используя Arduino только как внешнее исполнительное устройство. S4A взаимодействует с Arduino, отправляя состояния исполнительного механизма и принимающие состояния датчика каждые 75 мс, поэтому ширина импульса должна быть больше, чем этот период времени.
Не так давно здесь уже была заметка про визуальное программирование Arduino , но у этой заметки уже есть продолжение!
Встречайте проект Scratch для Arduino (в оригинале: Scratch For Arduino или сокращённо — S4A) — это модификация Scratch , которая предоставляет возможность простого визуального программирования контроллера Arduino , а так же содержит новые блоки для управления датчиками и исполнительными механизмами, подключаемыми к Arduino.
Версии S4A — есть как для Windows, так и для Mac и Linux.
А ещё мне очень понравился робот c беспроводной камерой, который фигурирует в демонстрационном видео ;)
S4A is a Scratch modification that allows for simple programming of the Arduino open source hardware platform. It provides new blocks for managing sensors and actuators connected to Arduino. There is also a sensors report board similar to the PicoBoard one.
The main aim of the project is attracting people to the programming world. The goal is also to provide a high level interface to Arduino programmers with functionalities such as interacting with a set of boards through user events.
The interface
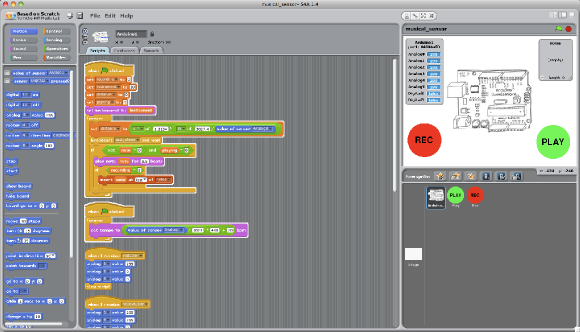 An S4A program to control a light-sensor Theremin, with record and playback capabilities
Arduino objects offer blocks for the basic microcontroller functionalities, analog and digital writes and reads, and also for higher level ones. You can find blocks to manage standard and continuous rotation servomotors:

In S4A, an Arduino board is represented by a special kind of sprite. The Arduino sprite will automatically find the usb port where the board is connected.
It is possible to connect to multiple boards at the same time by just adding a new Arduino sprite.
Technical details
Supported boards
S4A works with Arduino Diecimila, Duemilanove and Uno. Other boards haven’t been tested, but they may also work.
Connectivity
Components have to be connected in a particular way. S4A allows for 6 analog inputs (analog pins), 2 digital inputs (digital pins 2 and 3), 3 analog outputs (digital pins 5, 6 and 9), 3 digital outputs (pins 10, 11 and 13) and 4 special outputs to connect Parallax continuous rotation servomotors (digital pins 4, 7, 8 and 12).
You can manage a board wirelessly by attaching an RF module to it, such as Xbee.
S4A allows you to control as many boards as USB ports you have.
Compatibility
S4A is backwards compatible with Scratch, so you can open Scratch projects in it. However, you won’t be able to share your projects on the Scratch community website because doing so goes against the Scratch terms of use.
Take in account that this compatibility doesn’t work both ways, so you won’t be able to open an S4A project from within the original Scratch.
Using a PicoBoard along with an Arduino board is also supported.
Protocol
S4A interacts with Arduino by sending the actuator states and receiving sensor states every 75 ms, therefore the pulse width needs to be greater than this time period. The data exchange follows the PicoBoard protocol and needs a specific program (firmware) to be installed in the board. Please refer to the Downloads section for further instructions on how to do so.
Donate to S4A
If you wish to help us continue developing and maintaining this project, you can always make a donation!
Hardware? Child’s Play!
Scratch for Arduino (S4A) is a modified version of Scratch, ready to interact with Arduino boards. It was developed in 2010 by the Citilab Smalltalk Team and it has been used since by many people in a lot of differents projects around the world.
Our main purpose was to provide an easy way to interact with the real world by taking advantage of the ease of use of Scratch.
Here you’ll find all the documentation, videos, examples and exercices we have created.
Workshop
A zip file with complete materials and exercices for a workshop can be downloaded here:
These materials were created and used by our team in an actual S4A course at the Elisava School of Design (Barcelona) in 2011.
Basic Examples
Here you’ll find basic S4A examples, complete with the Arduino schematics and an .sb Scratch project file for you to download.
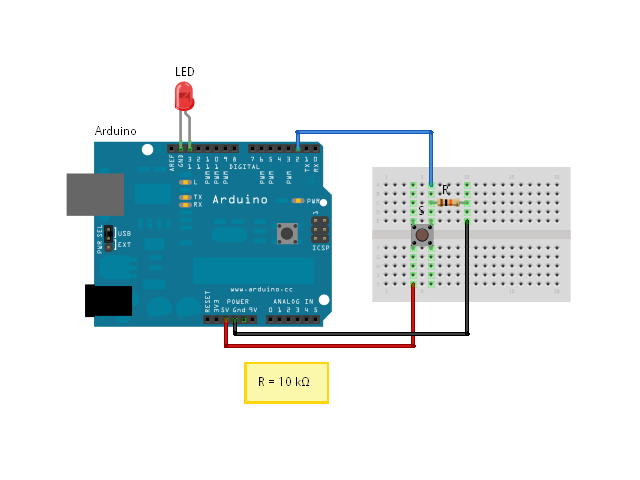
Button and LED
A simple example showing how to trigger an LED by pushing a button.
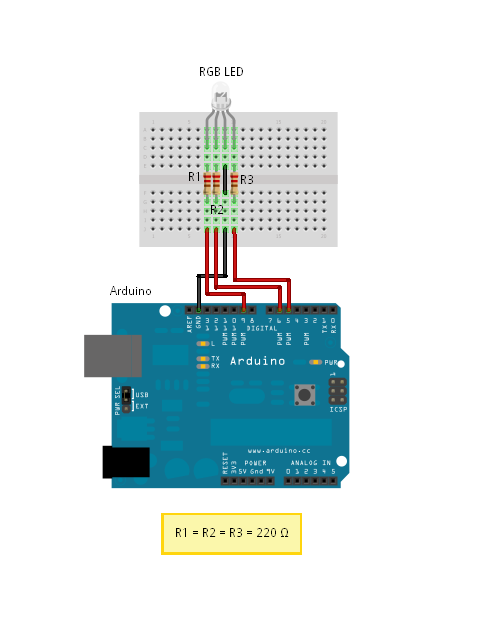
RGB LED
Using an RGB LED from Scratch.
Button, LED and keeping state
An LED that switches state when we push a button.
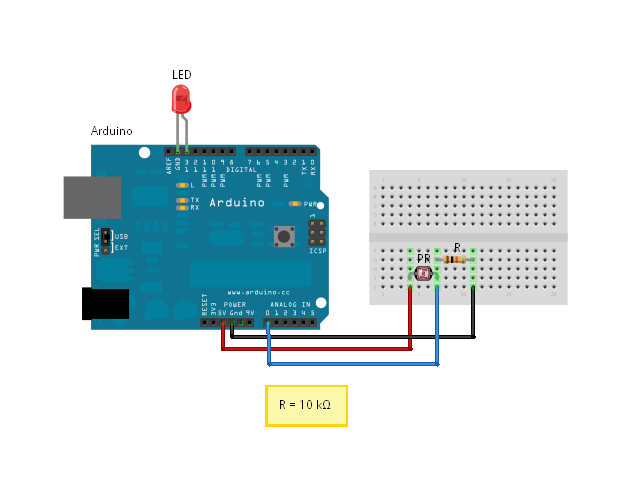
Photoresistor and LED
Using the input of a photoresistor sensor to trigger an LED.
Videos
Some of the following demos are in Catalan or Spanish, but the images pretty much speak for themselves. Some of the videos have English subtitles as well.
Full-featured Robot
A robot with a rotative camera, distance sensors and a remote control. It uses two arduino boards (remote control + robot), an XBee wireless module, three IR sensors, a camera module and three servomotors.
S4A Workshop Introduction
This video serves as an introduction for the S4A workshops given at Citilab, but you’ll find a couple of demos of what can be achieved with our software.
Exercices
For Developers
External Documentation Links
Hi Scratch for Arduino!
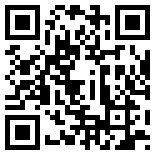
We have developed a simple Android application that can communicate with S4A through HTTP by means of the remote sensors protocol in Scratch. You can download it here or by scanning the QR code below:
To use it, follow the instructions below:
- In S4A, enable remote sensors (right click on any "Sensors" block)
- In HiS4A (Android), type the local network IP of the PC where S4A is running (you can find that out through Edit > Show IP address), plus the prefix (only needed if you are connecting from more than one Android client)
- The buttons correspond to messages and the touchpad and slider to remote sensors
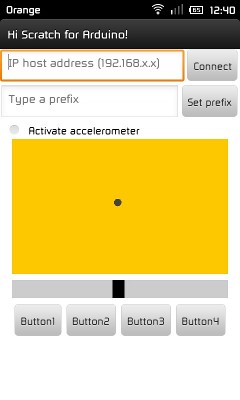
IMPORTANT! Both S4A as HiS4A must be connected to the same local network!
HTTP API
The Android application uses a very simple protocol we developed on top of the Scratch HTTP message protocol, so it is also possible to interact to S4A from a browser or any other network enabled application.
You will first need to enable the remote sensors option in S4A (right click on any "Sensors" block).
Message Specification
Broadcast a message:
http://[IP]:42001/broadcast=[message-name]
Send the value of a remote sensor (for instance, the client’s accelerometer, mouse position, etc):
http://[IP]:42001/sensor-update=[sensor-name]=[value]
Update an S4A variable:
http://[IP]:42001/vars-update=[variable-name]=[value]
Test web application
If you want to see the HTTP API in action, you can do so from our test webapp:
Using the example web application:
- S4A variables whose name starts with a plus sign (i.e. +playerName) are visible and modifiable from the web client
- S4A variables whose name starts with a minus sign (i.e. -playerScore) are only visible (not modifiable) from the web client
- S4A variables whose name doesn’t start ether with a minus or plus sign are not visible from the web client
- S4A messages whose name starts with a plus sign (i.e. +startGame) are visible from the web client
- S4A messages whose name doesn’t start with a plus sign are not visible from the web client
Version 1.6
Firmware:
Version 1.5
- Fixed object collision bug (Arduino and non-Arduino)
- Fixed bug related to persistent message error when stopping and resuming connection with the board
- Changed indexed primitives to named ones for better compatibility with new Squeak VMs (thanks to Miriam Ruiz for the patch)
- Changed pin 12 from standard servo to normal digital output
- Changed default pin at digital on/off blocks from 13 to 10
- Added reset actuators block
- Improved Catalan and Spanish translations
Version 1.4
- Added full compatibility with HTTP protocol (POST AND GET), you can now send messages to S4A and watch/modify variable values from an Internet browser (among other things). See Android section.
- Added a "check for updates" option in "Help" menu, from now on there is no need to visit website to check for new versions
- Language is now detected upon first launch (when Scratch.ini file doesn’t exist). Also saved in same file if changed from language menu
- Serial port where a board is connected opens correctly when S4A is launched
- Fixed bug in Windows version, in which title bar didn’t show the name and version of S4A when launched
Version 1.3
- Fixed compatibility with Arduino UNO on Linux (thanks to Jorge GГіmez). You will need to load the new firmware, besides updating the bootloader in some boards
- Changed the sensor board names and their corresponding Arduino blocks to show real pin numbers
- Added server commands to "Edit" menu to manage network communication over sockets
- Added compatibility for Android apps (HiS4A)
- Improved Catalan and Spanish translations
- Lots of bugfixes
Installing S4A requires you to install software both in your PC and your Arduino board. Here you’ll find the detailed steps to get it up and running.
Installing S4A into your computer
S4A works in the three major consumer operating systems. Download and install the one that fits your configuration:
Installing the Firmware into your Arduino
This firmware is a piece of software you need to install into your Arduino board to be able to communicate with it from S4A.
- Download and install the Arduino environment by following the instructions on http://arduino.cc/en/Main/Software. Take in account Arduino Uno requires at least version 0022.
- Download our firmware from here
- Connect your Arduino board to a USB port in your computer
- Open the firmware file (S4AFirmware16.ino) from the Arduino environment
- In the Tools menu, select the board version and the serial port where the board is connected
- Load the firmware into your board through File > Upload
Arduino drivers
If you are a Microsoft Windows user, you may need to install the Arduino drivers into your computer:
For Developers
S4A is free software distributed under an MIT license.
Since Scratch is actually a Squeak Smalltalk image, all of its code is actually shipped with the final user version itself. To access it, just shift + left click on the S4A "File" menu and select "Exit User Mode". You’re now in front of a classic Squeak 2.8 image, and have access to a Browser, Workspace and all tools you’re used to.
However, in the final user version some code has been compiled and you’ll be missing several variable and message argument names, which is why we are also providing you with a clean source code image for developers, downloadable here:
Alternative download site
Since our VPS provider may sometimes be down, we’ve set up an alternative location for all files, including old versions:
Coming Soon!
As a response to requests by the S4A community, several of our students, and users around the globe, we are developing a series of kits that will provide the necessary hardware to get started with S4A, with preinstalled firmware and documentation.
These kits will come in incremental upgrades, so that you won’t need to pay for components you don’t require for your project.
General questions
Can the S4A firmware damage the board?
In fact, our "firmware" is just like any other Arduino sketch, so there is no risk at all. Of course, you can upload other sketches to the board and then upload the S4A firmware again when needed.
Can the S4A programs be pushed into the Arduino board?
There is currently no way to compile code into Arduino binaries. It must be said that S4A was conceived as an improvement of the older versions of Scratch (the ones that were developed in Smalltalk), to make learning how to program real-world objects easier to everyone, specially to children, by dealing with these real objects in the same way they’d deal with Scratch "normal objects", so they can interact between them. In other words, it was not made to program the board directly, but to help learn programming and electronics at the same time.
Still, if what you want is to just get rid of the USB cable, we recommend you use a wireless device like XBee.
Can I change the pinout configuration?
Unfortunately, no. Pin configuration is hardcoded both in the firmware and in the source code of S4A, and the way S4A is made does not allow to change source code "on the fly". So, until we find a better way or enhance the communication protocol between the board and the program, the only way to customize the pinout is by changing both S4A source code and the firmware. There is a Spanish unofficial guide available here (thanks to Borja PГ©rez).
Which boards does S4A support?
S4A works with Arduino Diecimila, Duemilanove and Uno. Other boards haven’t been tested, but they may also work.
Will S4A work on my PC?
S4A works on the three major consumer operating systems: Microsoft Windows, GNU/Linux and MacOS. So yes, it will most probably work on your PC.
Installation troubleshooting
I can’t install it on 64-bit Ubuntu/Debian
The Debian version of S4A is packaged only for i386 systems. To get it working in a 64-bit version, you need to follow the following steps (in a terminal, as root):
Fist of all, enable i386 packages and install ia32-libs
dpkg –add-architecture i386
apt-get update
apt-get install ia32-libs
Then install S4A:
dpkg -i –force-architecture S4A16.deb
I’m having issues trying to install it on MacOS
Since MacOS 10.8 (Mountain Lion), Gatekeeper is set up by default to allow downloaded applications only from "Mac App Store and identified developers". To install S4A, you’ll need to change this option to "Anywhere".
Board connection troubleshooting
I’ve connected the board and S4A does not detect it
Make sure you have uploaded the latest S4A firmware to the board before starting S4A. To do this you’ll need the official Arduino IDE.
Please follow the instructions on the Downloads section in this website.
Been there, done that. Board still not detected
This is a common known issue in Windows operating systems. Try stopping the connection with the board (right-click on sensor board in S4A), unplugging the USB cable, plugging it again and restarting the connection. If the program still does not detect the board, there may be a conflicting serial COM port causing S4A to hang when trying to open it. To avoid this, try opening it directly (right-click on sensor board and select serial port) or changing the assigned Arduino COM port through the Windows Device Manager. For more help on this issue, please visit this guide.
S4A has been developed at Citilab by the Edutec Research Group, with the help of the Smalltalk.cat programming group and of collaborators like Jorge GГіmez, who leads the hardware and software educational project at Miscela.
Marina Conde

Marina Conde got her bachelor degree in Computer Science in the Technical University of Catalonia (UPC) in 2009, and graduated as a Computer Engineer in 2012 in the same university.
While working at Citilab, she developed her first final thesis, which consisted in building a framework to work with Arduino boards from within the Pharo Smalltalk environment. Later on, she used this project as the basis on which S4A was written.
VГctor Casado

VГctor chose to study Computer Science in the Autonomous University of Barcelona (UAB), but after two years he switched to the Castelldefels School of Technology (EPSC) to course the technical degree on telecommunications.
While there, he had the opportunity to enter Citilab through an internship, where he later developed S4A, his final thesis.
Joan GГјell

Joan is a biologist who, in his early years, worked in the field of ecology. The need to analyze the generated information and collected data drove his approach to computing. He enrolled to his first programming course in 1975, when computers where still programmed by means of punch cards.
His main work in Citilab has been related to the field of training in two areas: teaching programming with Scratch, especially to children, and teaching computer skills to early adult citizens.
Jose GarcГa

Jose studied advanced telecommunications engineering, but started working at a publishing firm before completing his degree. During his time at the company, he worked on programming a wide variety of applications.
At Citilab, he discovered Scratch and Smalltalk, taking up part of his programming work again. Later on, he joined different projects that aim to establish closer contact between users and programming. He currently leads the Technological Education Research team Edutec.
Bernat Romagosa

In 2009, Bernat graduated as a technical engineer in Computer Science at the Open University of Catalonia (UOC). He learned Smalltalk at a course given by Jordi Delgado at Citilab in 2008, where he was later hired to build an online programming school.
Since then, he’s been involved in several programming projects in Citilab, including a social knowledge management system and different educational applications.
Jordi Delgado

Jordi is an associate professor at the Software Departament of the Technical University of Catalonia (Universitat PolitГЁcnica de Catalunya). He belongs to the research group LARCA and teaches at the Barcelona School of Informatics.
He spends most of his time divulging, spreading the word of and programming in Smalltalk, an amazing programming language that, you know, everyone should be using. He is a member of the board of the European Smalltalk Users Group (ESUG) and he leads the Smalltalk.cat local group.
Smalltalk

Scratch was developed in Squeak Smalltalk by the MIT. Being Smalltalk programmers ourselves, we were able to modify its source code in order to achieve interaction with Arduino boards.
For any questions and answers, please use the community support mail list. You can subscribe by sending an email to:
Once subscribed, you can reach the list at:
And you can subscribe, contribute and browse the mail list forum at: